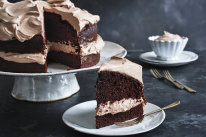
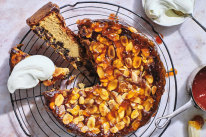
RecipeTin Eats x Good Food: Six-layer Christmas pavlova vanilla cake


This is a stunning combination to eat and look at! Three layers of my famous, plush vanilla cake topped with a three-tiered pavlova and copious amounts of whipped cream. Astonishingly straightforward to make. Really, you just have to take care assembling. And it can all be prepared ahead. Even the whipped cream*. Please note, I make the pav a day ahead because I cool it overnight in the oven.
Ingredients
Pavlova
½ cup (125ml, 4-5 eggs) egg whites, at room temperature
1 cup (200g) caster sugar
2½ tsp cornflour
1 tsp white vinegar
Vanilla cake
3 cups (450g) plain flour
3¾ tsp baking powder
¼ tsp salt
6 eggs (55-60g each), at room temperature
2¼ cups (450g) caster sugar
170g unsalted butter, cut into 1.5cm cubes
1½ cups (375ml) milk, full fat
4½ tsp vanilla extract
4½ tsp canola oil
Stabilised whipped cream
750ml thickened cream
250g mascarpone cheese
1⅓ cups (200g) soft icing sugar, sifted
2 tsp vanilla bean paste (or extract)
Decorations
500g strawberries
2 punnets raspberries
5 large passionfruit
20 small mint sprigs
silver balls
3 butternut biscuits (or other golden sweet biscuit), crushed into crumbs
Method
1. For the pavlova, preheat oven to 150C fan-forced (170C conventional).
2. Beat egg whites at high speed in a stand-mixer for 30 seconds. With the beater still going, add sugar 1 tablespoon at a time over 1½ minutes. Continue beating for another 6 minutes.
3. Add cornflour and vinegar then beat for a further 30 seconds. Flip bowl upside down. Meringue should be stiff enough that it does not fall out! If it does, keep beating.
4. Dab a bit of meringue on each corner of 2 baking trays then line with baking paper. Dollop just under half the meringue mixture on one tray and shape into a 13cm round, 3cm high. Use remaining meringue to make an 11cm and a 9cm round, both 3cm high, on the other tray.
5. Place in oven and immediately turn it down to 100C fan-forced (110C conventional). Bake for 1½ hours or until dry to touch and lightly crisp on the outside. Cool in the closed oven for at least 4 hours, or overnight. Store in an airtight container until required (best used that day but still great the next day).
6. For the vanilla cake, preheat oven to 160C fan-forced (180C conventional). Grease 3 x 20cm cake tins with butter and line with paper (see note).
7. Mix the flour, baking powder and salt in a bowl. Using a stand-mixer fitted with the whisk attachment (or hand held beater), beat the eggs on a medium speed for 30 seconds. With the beater still going, slowly add the sugar over 45 seconds. Continue beating for 6 minutes until the egg triples in volume and becomes white.
8. Meanwhile, place butter and milk in a saucepan over medium high heat until the butter is melted. Do not let it boil. Set aside. Add vanilla and oil.
9. Once the egg is ready, add the flour in 3 lots, beating for 5 seconds on a very low speed in between. Then beat until you can no longer see flour, about 10 seconds. Transfer about 1½ cups of the batter into the hot milk and whisk until combined (it will be foamy).
10. With the beater on very low, pour the hot milk into the batter over 15 seconds. Scrape down the sides of the bowl then beat slowly for 10 seconds until smooth.
11. Divide batter between tins. Bake for 30 minutes or until skewer inserted into the middle comes out clean. Cool in the tin for 15 minutes then cool upside down on racks. Store 3 days in an airtight container. It will remain like it is freshly made (this is why this cake is a miracle!). Use a serrated knife to trim the cake to make it flat.
12. For the stabilised whipped cream, beat all ingredients in a large bowl for 3 minutes on high or until stiff peaks form. (Best made close to assembling time but is 97 per cent like freshly made 24 hours later).
13. To assemble, pick the largest strawberries and cut 10 x 1.25cm thick rounds. These will act as pillars to hold the layers up. Chop remaining strawberries into 1.25cm cubes.
14. Place 1 vanilla cake on a serving platter. Spread with 0.5cm thick layer of cream. Press in 5 strawberry pillars (as pictured in the photo above). Scatter around chopped strawberries. Cover with a thin layer of cream. Top with another layer of vanilla cake and repeat, then top with the third cake.
15. Spread the top and sides with cream. Dollop half a cup of cream in the middle of the cake then press in the largest pavlova. Top with a dollop of cream, the next largest pavlova and repeat to finish with the smallest pavlova.
16. Decorate with raspberries, using extra cream to "adhere" where you'd like, passionfruit pulp, mint sprigs and silver balls. Scatter biscuit crumbs around the base. Serve with a flourish and bask in the praise!
Notes
*The handy secret with the cream is to add mascarpone to increase the shelf life. It doesn't alter the flavour or texture, but will stay fluffy for 48 hours.
If you only have 2 cake tins, pour ⅔ of the batter in 1 tin and ⅓ in the other. Bake the small one for 30 minutes and the taller one for 40 minutes (check with skewer) and cut the larger one in half when cool.
Don't skip the 4½ tsp of oil in the vanilla cake. Sounds like a tiny amount but it does wonders for the moistness and shelf life of the cake.
To serve, it is easiest (and safest) to remove the pavlova and cut it up separately to the cake.
Leftovers will keep for 2 days after assembling but the pav will soften and get a bit chewy.
This recipe features in RecipeTin Eats' Christmas menu
Update: the baking temperature and cooking and cooling times for the pavlova component have been revised down from an earlier version of this recipe.
Appears in these collections
The best recipes from Australia's leading chefs straight to your inbox.
Sign up- More:
- Cake
- Fruit desserts
- Dessert
- Christmas
- Australia Day
- Eggs
- Cream & milk
- Berries
- Kid-friendly
- Modern Australian
- Summer
- Baking
- Entertaining
From our partners
Similar Recipes
More by Nagi Maehashi


RecipeTin Eats’ lamb cutlets with fondant potato, jus and salsa verde
- 30 mins - 1 hr
- Nagi Maehashi